|
After studying the period receipts and noting the similarities & differences, I decided to combine all three recipes in making my cockentrice. The construction of the beast is basically the same in all 3 sources, and so I began by purchasing from a local butcher a 20 lb. pig, which was the smallest I could find. Some modern cooks (such as Madeleine Pelner Cosman, author of Fabulous Feasts) recommend using a suckling pig when making a cockentrice, but the medieval recipes clearly imply that it is a pig (or "grys") that should be used - not a piglet or a "gryse." In addition, the butchers I talked to told me that it was impossible for them to get me a suckling pig, and a few even seemed aghast at the idea! From the same butcher I also obtained an 8 lb. capon. The pig was cut in half a few inches below the shoulders, at a point that matched the width of the capon as closely as possible. The capon was cut more or less in the exact middle. Because my butcher cut the animals for me, I was unable to parboil them first, as described in all 3 recipes: however, both the pig and the capon were parboiled before sewing together. At first I had decided against parboiling them: I reasoned that the boiling was originally done to remove salt or other preserving agents, and to also insure a fully cooled product after roasting. Since my pig was fresh from the butcher and would be roasted in an oven, these factors didn't apply in this case; however, I soon realized that parboiling would making sewing them together much easier, as the flesh and skin wouldn't be as difficult to run a needle through. (Recipe 3 has the cockentrice sewn, stuffed, and then boiled, but in this instance I followed the procedure described in recipes 1 & 2.)
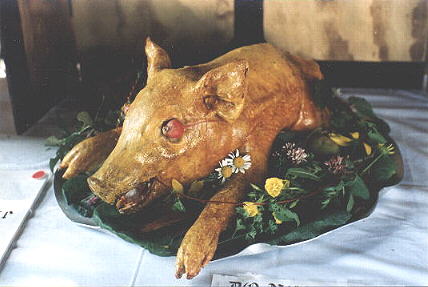
Syr Pig on Display After parboiling and
allowing to cool, the beasts were sewn together
at the waists: the cockentrice with the pig on front was soon dubbed
"Syr
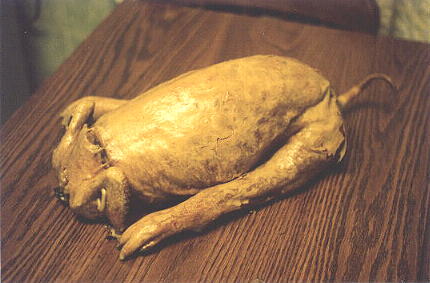
Pyg" and the cockentrice with the capon on front was given the name
"John
Thomas." To sew them I used a large, flexible, homemade needle and some
heavy cotton cord, similar to the type used by butchers and
professional
cooks. (Sewing the animals together was a bit strange, but I
persevered!
I rather felt like Dr. Frankenstein, stitching dead bodies in the
middle
of the night....) A hammer and an ice pick were used to puncture suture
holes in the cockentrice, and the needle and thread slipped easily
through.
When done, I stuffed them (see my notes on the stuffing mixture) and
then
roasted each at approx. 2 1/2 - 3 hours in a conventional oven. (I had
seriously debated roasting the cockentrice on a spit as stated in all 3
recipes, but the logistics of sanitation, hygiene, and convenient
necessity
won out.)
The Hideous John Thomas After roasting, the animals
were removed from the oven and were placed
on clean roasting pans to be gilded. For the "endoring" I followed the
process described in recipes 1 & 2 (see my notes on the gilding). A
mixture of egg yolks, ginger, saffron, and parsley juice (which added a
lovely greenish "patina") was brushed on each one, then the beasts were
placed back in the oven for approx. 1 minute for the glaze to set. This
process was repeated several times until a beautiful gold coating was
achieved.
For decoration's sake, I added radish "eyes" to Syr Pyg and he was
placed
on a platter embellished with fresh greens and wildflowers - a bit of
whimsy
and creativity on my part.
The Stuffing For the stuffing I combined
recipes 1 & 2 (which were nearly
identical) with recipe 3. Recipes 1 & 2 formed the base of the my
recipe,
and the ingredients from no. 3 were added as additional flavor and for
a little variety (recipes 1 & 2 are tasty, but a bit boring). Using
a large cheese grater, I grated white, brown, and grain bread and
combined
them into one mixture. White, brown, and grain breads were common in
the
Middle Ages, and I feel a combination of the three is very appropriate.
To the bread I added very finely diced sheep suet (also from my
butcher),
ground pork liver (parboiled in advance), salt, saffron, pepper,
ginger,
cloves, beaten eggs, currants, pine nuts, and sugar. (If pine nuts are
unavailable, feel free to substitute with slivered almonds, which are
approx.
the same shape and color as pine nuts. Since almonds were an essential
ingredient in Medieval menus, this is a quite acceptable.) I did not
wish
to use the pork liver raw as recipe 3 indicates - once again, hygiene
&
the urge not to food poison anyone ruled out over strict authenticity.
Therefore, the pork liver was parboiled & ground before adding to
the
stuffing mixture. Also, the original recipe for the pomme dorryse
has this "fars" being rolled into small balls, boiled, and then
roasted - this would guarantee a completely cooked product, while
stuffing
the same mixture raw into a large animal would not. Seeing that this
stuffing
was actually meant to be boiled during one stage of the cooking
process,
I decided that parboiling the liver was appropriate. When all the
ingredients
were combined, I used my hands and did "melle all to-gedre"
until
thoroughly mixed. The stuffing was then placed in the cockentrice just
before roasting.
The Gilding For the gilding, or
"endoring" of the cockentrice, I chose to follow
recipes 1 & 2, which uses a glaze with an egg yolk base. Actually
there
was little choice in this decision: the gold & silver foils, as
used
in recipe 3, were simply beyond my financial means and so couldn't be
seriously
considered. Now, the addition of the parsley juice in 1 & 2 gave me
a lot of thought - why bother to make the cockentrice a golden color,
only
to cover it with green parsley juice? My initial reaction was to assume
that the parsley juice added a sort of green "patina" to the gold,
making
it look more like tarnished metal. However, other cooks (again using
Madeleine
Pelner Cosman as an example) claim that the parsley juice is somehow
painted
on in fanciful decorations & patterns - Cosman goes so far as to
add
flour & wine to the juice in her cockentrice recipe to make an
actual
"paint" out of it. I wasn't completely convinced of this
interpretation,
especially as the medieval receipts don't really indicate such a
procedure,
and so I experimented with the gilding on an extra capon. I soon that
realized
that my original assumption of a patina-like effect was correct.
Parsley
juice, by itself, is not thick enough to be used in any way as a paint
or even as a way of adding a significant amount of green color - when
applied
to the glazed bird, it merely ran off and left no trace of itself. But,
by adding the parsley juice directly to the glaze before applying, a
greenish-gold
shade was achieved, and the extra liquid of the juice broke down the
viscosity
of the egg yolks and made applying the glaze much easier. In addition,
I found out to my surprise that parsley juice isn't a beautiful, dark
green
as one would imagine - the juice which I obtained from squeezing
chopped
parsley was greenish-yellow and looked very much like the "patina" I
had
imagined.
Forward to: Recipe for Cockentrice| Back to: The History of the Cockentrice | Back to: Cockentrice Table of Contents |

The Cockentrice - A Ryal Mete is © James L. Matterer
Please visit The Gode Cookery Bookshop